Best Face Blurring Tools for Privacy & Compliance (2026)
Privacy risk is rarely about one dramatic mistake. Most leaks happen because normal content gets posted without a final anonymization pass. A family vlog, a street interview, an event recap, or a customer story can expose faces, license plates, or body details that were never meant to be public.
Face blurring solves this with a repeatable workflow: upload, choose privacy method, review, publish. The key is consistency. If your process is simple, your team follows it every time.
Best face blurring solution by use case
There is no single best privacy effect for every file. The right solution depends on the media type, how public the final export will be, and whether compliance review matters.
| Use case | Recommended workflow | Why it fits |
|---|---|---|
| Photos for quick sharing | Browser photo face blur | Images stay local in your browser and export immediately. |
| Public videos with bystanders | Blur all faces in video | Fast baseline anonymization for events, street clips, and group footage. |
| Compliance-sensitive footage | Pixelize or black box faces | Stronger masking survives reposting and platform compression better than soft blur. |
| CCTV or wide-angle scenes | Full-body anonymization | Faces may be too small, turned away, or not enough to prevent recognition. |
| Dashcam and street footage | License plate + face blur | Vehicle plates can identify people even when faces are hidden. |
| Interviews or creator clips | Selective face blur | Keep the speaker visible while anonymizing guests or bystanders. |
| Creator-friendly face effects | AR filters | Add tracked overlays for style, while using anonymization modes when strict privacy is required. |
FaceBlurify covers these workflows through separate photo, video, full-body, license plate, and selective blur modes, so you can choose the level of protection before export instead of fixing mistakes after publishing.
Quick privacy workflow you can run in minutes
- Open the correct tool:
- Photos: /en/tools/blur-faces-photos/
- Videos (all faces): /en/tools/blur-faces-videos/
- Videos (full body): /en/tools/blur-fullbody-videos/
- Upload your media.
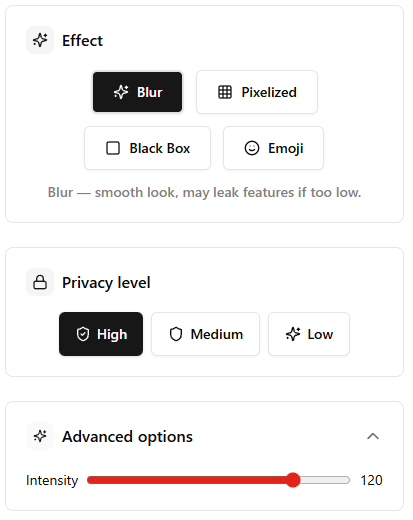
- Pick the effect:
- Pixelized for strong anonymity.
- Blur for softer visual style.
- Black Box for maximum visual certainty.
- For videos, decide whether to keep original audio.
- Process and review frame-by-frame sensitive moments.
- Download and keep only the anonymized export for publishing.
Choosing the right privacy level
For most public publishing, use a strong effect first, then reduce intensity only if readability suffers.
- High-risk scenes (crowds, minors, street footage): use stronger pixelation or black box.
- Corporate content (internal review, demos): blur can be enough if identity is still clearly obscured.
- Mixed footage: use selective mode to keep speakers visible while blurring bystanders.
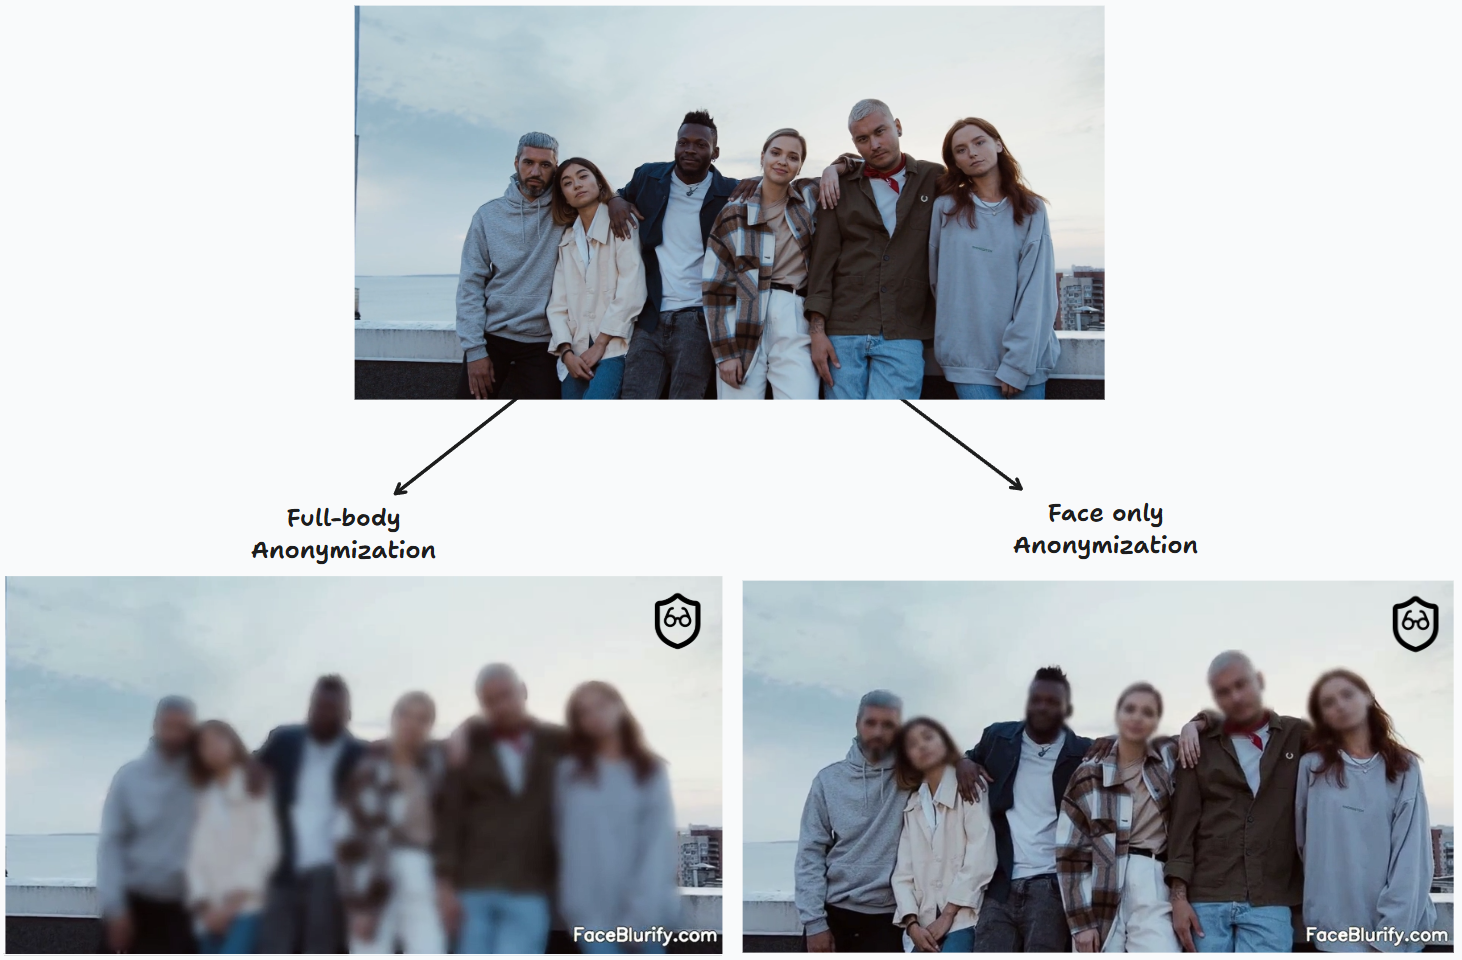
Face blur vs full-body anonymization
Face blur is usually enough when people are front-facing and camera distance is close. Full-body anonymization is safer when identity could still be inferred from body shape, clothing, or movement.
Use full-body mode when:
- The camera is far from subjects.
- Faces are partially visible or turned away.
- You need stricter anonymity for compliance-sensitive footage.
See the full comparison: Face blur vs full-body anonymization.
Team checklist before publishing
Run this as a final gate:
- No unblurred faces in intro/outro frames.
- No reflection leaks (mirrors, glass, windows).
- No visible children if policy requires anonymization.
- No readable license plates, badges, screens, or documents.
- Audio policy reviewed (muted, kept, or edited).
- Export filename and share link do not expose personal info.
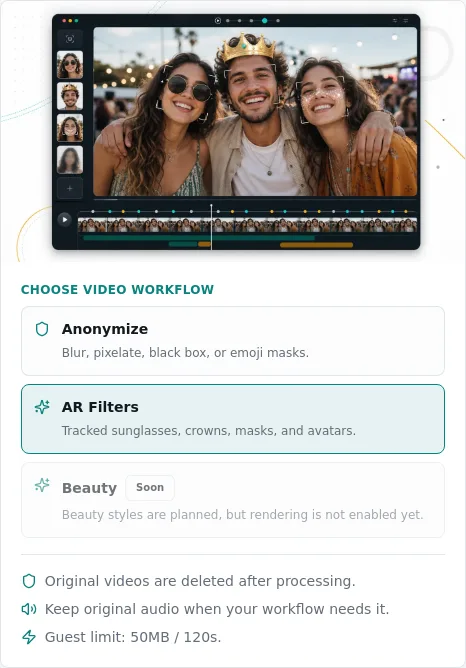
Where AR filters fit
FaceBlurify also includes video AR filters for creator workflows. Styles such as Sunglasses, Party Glasses, Neon Visor, and Privacy Avatar can make a clip feel more expressive, but they are not a replacement for compliance-grade redaction.
Use AR filters when the goal is style or light identity coverage: /en/blog/add-ar-filters-to-video-online/
Use pixelized, black box, selective blur, full-body anonymization, or license plate redaction when the goal is strict privacy.
Common mistakes and quick fixes
Mistake 1: one missed face in a fast scene
Fix: re-run with selective workflow and tighter analysis settings.
Mistake 2: effect looks too weak after compression
Fix: increase intensity and test with your target platform compression.
Mistake 3: anonymity is needed beyond faces
Fix: switch to full-body anonymization mode.
Compliance-focused review questions
Before publishing, ask these questions:
- Can a person still be recognized from clothing, gait, tattoos, or context?
- Does the clip include minors, patients, students, employees, or customers?
- Will the video be uploaded to a platform that compresses or sharpens the image?
- Is the anonymized output being used for internal review, public marketing, legal sharing, or archival storage?
If the answer raises risk, use a stronger effect, full-body mode, or a second review pass.
Related guides
- Best practices for anonymizing videos
- Add AR filters to video online
- How to blur faces in photos
- Face blurring vs other methods
FAQ
Is face blurring enough for privacy?
It depends on scene risk. For close-up interviews, yes in many cases. For distant or complex scenes, consider full-body anonymization.
Can I keep the original audio?
Yes. In video mode, you can preserve original sound while anonymizing visuals.
Is this legal advice for GDPR or compliance?
No. This is a practical workflow guide. Always validate final policy with your legal/compliance team.
What is the fastest way to start?
Use blur-all mode first, then move to selective mode when you need person-by-person control.
When privacy is part of your publishing routine, anonymization becomes fast, predictable, and much safer.